General BillingBot Settings
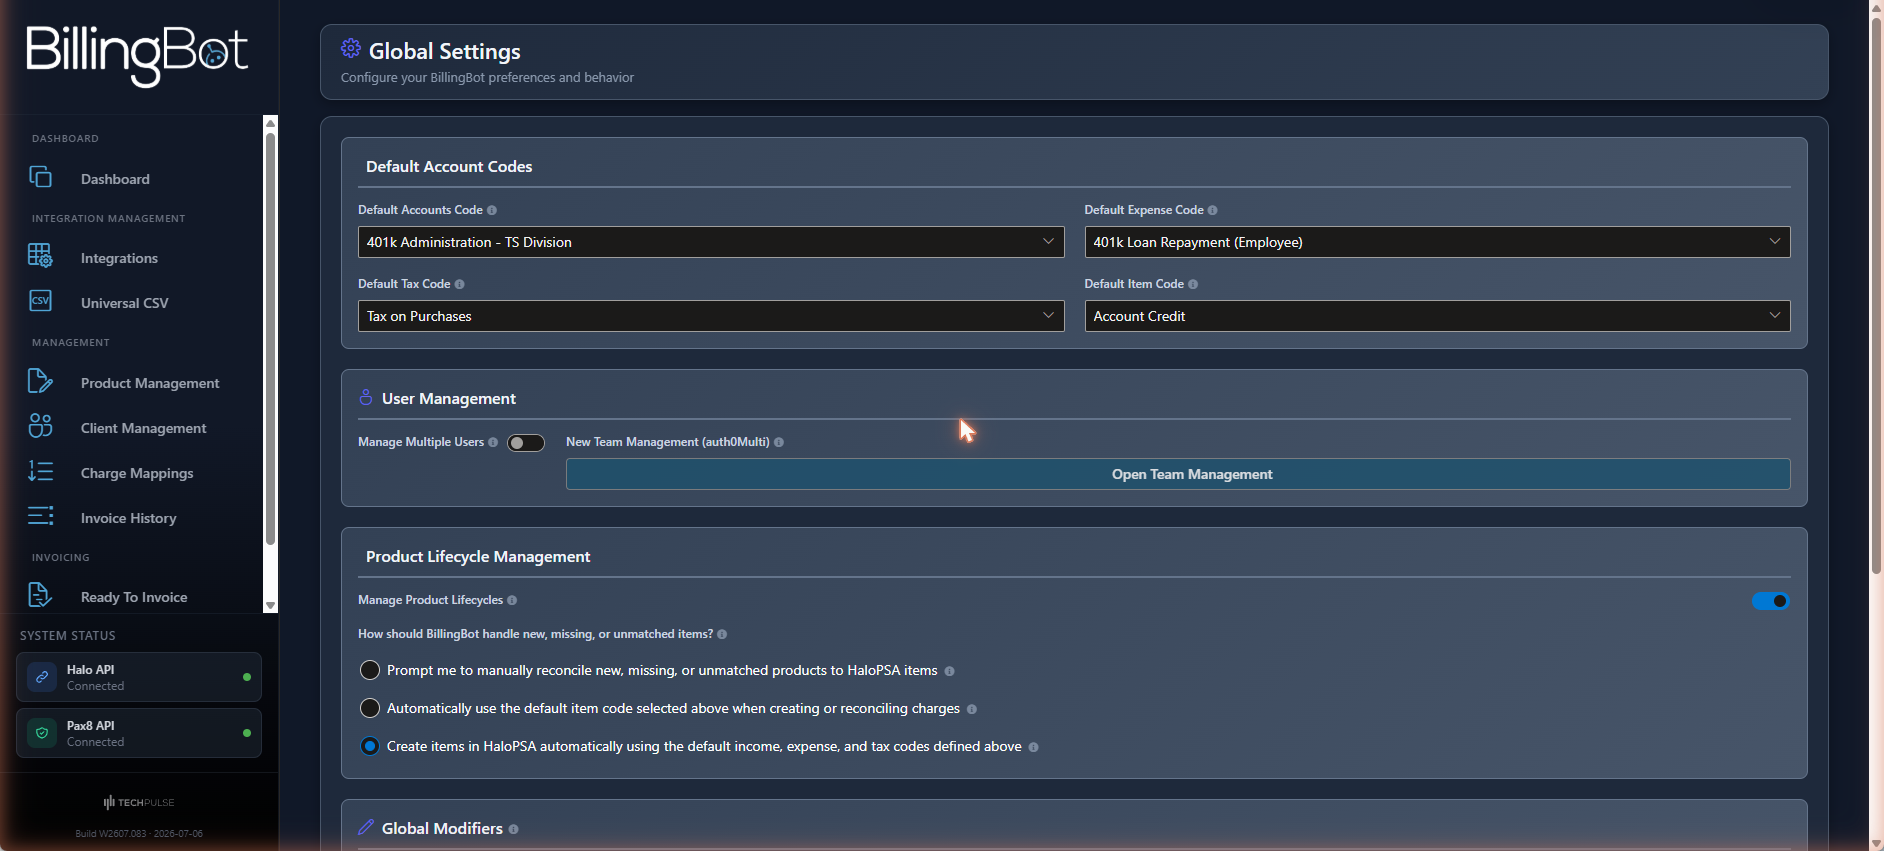
On this screen you define how BillingBot behaves when billing: which accounting codes to use by default, whether other people in your company can access the system, and how to handle products and invoices in HaloPSA. You access it from t...
Last updated 24 days ago
On this screen you define how BillingBot behaves when billing: which accounting codes to use by default, whether other people in your company can access the system, and how to handle products and invoices in HaloPSA. You access it from the gear icon at the top of the application.
When to use this screen
- When you set up BillingBot for the first time and need to define the default accounting codes (income, expense, tax, and item).
- When you want to enable access for multiple users on your account (Multiuser).
- When you need to decide what BillingBot does with new products that are not yet linked to a HaloPSA item.
- When you want to adjust global rules about which lines are included or dropped from invoices (for example, Azure lines or zero-dollar lines).
- When you need to decide whether charges are added to new invoices or to existing invoices in HaloPSA.
- When you need to completely remove your account (tenant) configuration.
What it shows
The screen is organized into several sections:
Default Account Codes
- Default Accounts Code: income code that will be used if a product does not have a specific one assigned.
- Default Expense Code: expense code that will be used if a product does not have a specific one assigned.
- Default Tax Code: tax code that will be used if a product does not have a specific one assigned.
- Default Item Code: HaloPSA item that will be used if a product does not have a specific one assigned.
These four fields are optional, but it is recommended that you configure them. The available options depend on your connected accounting integration in HaloPSA (Xero or QuickBooks Online) and on the existing codes/items in HaloPSA.
User Management
- Manage Multiple Users: toggle that enables more than one person to use your BillingBot account.
- New Team Management (auth0Multi): button that opens a separate screen to manage members, roles, domains, and access (see the related "Team Management" page).
- Auth0 Organization Name: name your company is identified by with the identity provider. People you invite will see this name when signing in. It only appears when "Manage Multiple Users" is turned off (that is, it is requested before you can enable it).
Product Lifecycle Management
- Manage Product Lifecycles: toggle that enables BillingBot to create and manage products/items within HaloPSA.
- If you enable it, three options appear (only one can be selected) for what to do when BillingBot finds a new product that doesn't match any HaloPSA item:
- Prompt me to manually reconcile...: BillingBot will ask you to manually associate the product before billing.
- Automatically use the default item code...: BillingBot will use the default item you configured above.
- Create items in HaloPSA automatically...: BillingBot will create the product in HaloPSA using the default income, expense, and tax codes.
Global Modifiers
Checkboxes that apply to all clients (they can be overridden at the individual client level):
- Drop Azure Lines: drops all Azure lines from invoices.
- Collapse Azure Lines: groups all Azure subscription charges into a single line per invoice, summing the cost/price.
- Drop Favorable Prorata: drops lines with a value less than $0 (credits or refunds).
- Drop Zero Dollar Lines: drops lines whose value is $0.
Global Invoice Behavior
Defines what BillingBot does with the charges it processes (this can also be overridden per client):
- Always Create New Invoices in HaloPSA: always creates a new invoice.
- Always Append Charges to the Latest Invoices in HaloPSA: always appends the charges to the latest existing invoice.
- Always Append Charges to the Recurring Invoices in HaloPSA: always appends the charges to recurring invoices.
Available actions
- Save Settings: saves all changes made on the screen.
- Remove Settings ⚠️: completely removes your account's (tenant) configuration. The system asks for confirmation before proceeding ("Are you sure you want to remove the Tenant?") and, once confirmed, this cannot be undone; you are then redirected to the tenant creation screen.
Step-by-step flow
Configure default accounting codes
- Open Settings from the gear icon in the header.
- In "Default Account Codes", select the income, expense, tax, and item code you want to use by default.
- Click Save Settings.
Enable access for multiple users
- Turn on the Manage Multiple Users toggle.
- Type the Auth0 Organization Name with the name that will identify your company.
- Click Save Settings. BillingBot will automatically create the organization needed to invite users.
- If you want to invite or manage members later, use the Open Team Management button.
Configure how new products are handled
- Turn on the Manage Product Lifecycles toggle.
- Choose one of the three behavior options (manual, use default item, or create automatically).
- Click Save Settings.
Adjust billing rules
- Check or uncheck the boxes in "Global Modifiers" based on what you want to exclude from invoices.
- Choose an option in "Global Invoice Behavior".
- Click Save Settings.
Remove the tenant configuration
- Click Remove Settings.
- Confirm the action in the dialog box that appears.
- Wait for the process to finish; you will be redirected to the tenant creation screen.
Common errors and how to resolve them
- Changes aren't saved and a generic error message appears: the system displays the error message received from the server. If the message includes a log reference, report it to support so they can review the details.
- No options appear in the accounting code dropdowns: this happens if your accounting integration (Xero or QuickBooks) in HaloPSA has no codes configured, or if the information couldn't be loaded from HaloPSA. Check your integration on the Integrations screen.
- I can't invite users even though I enabled "Manage Multiple Users": you must first type an Auth0 Organization Name and save the changes; without that name, the organization needed to invite people cannot be created.
- Nothing seems to happen for a moment when removing the tenant: this is normal; the process shows a loading indicator ("Process remove Tenant...") while it completes. Wait for it to finish.
Related screens
Was this helpful?
Still need help? Ask the team